Saturday, January 11, 2014

Time to consider some sending units, first up will be boost, and it might as well include vacuum while I'm at it...  Something affordable and widely available to noodle with seems appropriate.

This 3-bar GM-style sensor seems to cross-reference with enough other OEMs that it will fit the "available" category, and with a range from 1 bar of vacuum to 2 bar of boost, it will more than cover the 20 inches of Hg (-10 psi) to 5 psi of boost I need.


It's listed by several vendors on eBay for less than $30 with free shipping and a 2 year warranty, and according to more than one of the listings it has the following specifications:

- Weatherpack connector and wiring - ground (brown), signal (orange), 5V power (yellow)
- Temperature operating range of -40 to 260 F
- Response time from 10% to 90% of range within .001 seconds
- Automatic temperature compensation
- Linear scaling at all boost and vacuum levels
- Minimum of 99% accurate over full scale
- Cross-referenced with OEM part codes as follows:
  - GM: 16040749, 12223861, 12223861K
  - AC DELCO: 2131562
  - STANDARD MOTOR: AS210
  - AIRTEX: 5S2556
  - WELLS: SU504

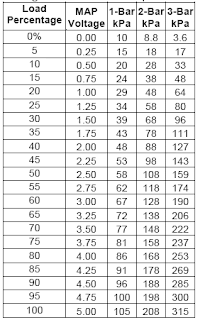
There's quite a bit of information on the web about these sensors, as they're available from Summit Racing and other sites.  There is a good cache of data at Robie the Robot specifically on the 3-bar sensor, including these data tables and drawings:

Formula for the GM 3 Bar MAP sensor is (V*8.94)-14.53, I have no idea why it's 14.53 and not 14.696, [rounds up to 14.7] but it works out on GM's chart every time. It is possible that Detroit is slightly above sea level, and you can use 12.11 in the formula for 1 mile above sea level.


A good full-size shot of this Delphi drawing and specs is available here.

Wednesday, January 8, 2014

The control board has been updated to take into account the internal switch layout, and the version number updated accordingly to 0.3x.


Sunday, January 5, 2014

A slight improvement made to the power supply board today, to rotate the DC Out screw terminals (J3) to be accessible from the edge of the board, so the wires don't have to be threaded past the smoothing capacitor.

The version number is iterated to 0.31x and the silkscreen is updated accordingly.


Saturday, January 4, 2014

During the next phase, when prototyping is happening on-car and on-bench in equal measures, it will be necessary to have an enclosure that makes things visible and easy to get in and out of a *lot*, while still being weatherproof.

To keep firewall-holes to a minimum, I'm thinking it makes sense to put the computing bits out under the hood, so this NEMA-rated, hinged clear-covered enclosure is hopefully just the right size for both the power supply and the Arduino together.  It is the WD-06-03 available at Polycase here.


And eventually, these waterproof power cables from AdaFruit should come in handy, along with the matching waterproof 4-way data cables.

Wednesday, January 1, 2014

Not forgetting that we need to put an enclosure *somewhere*, and that simplicity and protection are key design factors, it will be important to have more than one option.  There now exists a cover and extender for any combination of externally powered "innards", e.g. Arduino alone, power supply alone, or both together.  The Arduino connections come out through the case, and the main power supply line can be drilled and custom fit.


There's also an option for putting everything into one enclosure and keeping all but the most basic of wiring internal - a custom hole can be drilled for whatever power and data lines need to be run into the enclosure, then it can be sealed shut against the elements.


Tuesday, December 31, 2013

With the 4D display mocked up (roughly), it was clear there would be some interference inside the display case.  For the first prototype, it'll be slightly wide due to the control board, and now it's about 2 mm taller to take the display's PCB bezel into account.  (NOTE: The 3D model I designed of the OLED-128-G2 for prototyping is now available to the community in the TinkerCAD Gallery as well.)

The "cutaway" (actually the "hole" option) of TinkerCAD is very useful for seeing inside enclosed spaces.


It's also handy for measuring where to put features like micro-SD card slots.


While most of these models are white because it helps to have as much brightness and contrast as possible during on-screen designing, the finished product will most likely be black - (but a huge number of color options are available in ABS filament, and plastic paint would make the options virtually limitless).

I'm also making big changes to the power supply, to make it even more robust in light of the vagaries of car-supplied power.  The main capacitor is being super-sized to a 63V-capable unit that can withstand load dumps from the alternator, but which at a size larger than a typical C-battery requires a lot more room in the enclosure, and doesn't leave much room for anything else - so the enclosure is now expanded, and the capacitor has to come off the board and be wired to it, with a mounting method similar to that shown.  The middle capacitor is also being changed to *lower* its voltage in line with the original project instructions in "Practical Arduino", to minimize ESR (equivalent series resistance).


With these changes, the revision number of the project file increments to 0.3x and the Mouser projects have been updated to reflect the component changes.  There are no wiring changes so the 0.2x PCB project on OSH Park remains applicable.

Monday, December 30, 2013

PDuino's power supply is now prototyped in TinkerCAD in 3D, which is helpful when designing the enclosure and testing for interference between the components.


The combined power supply and Arduino enclosure is also prototyped, despite some loss of progress due to TinkerCAD crashes, and the power supply fits nicely (upside down) over the top of the Arduino.  I had a nice transparent cut-away view but that's when TinkerCAD crashed (again).


Progress continues on the display enclosure as well, but a lot of work remains to be done there as it's the most visible piece.  This will most likely be a real "prototyping" approach using physical models for fit and finish.

All of the 3D models are shared on TinkerCAD, search for "PDuino", or use the Convenient Links I added on the right side of the blog, which will be updated to always point to the latest revision of design files for the project.

Sunday, December 29, 2013

A nice borrowed enclosure for the Arduino, and a *very* rough beginning of an enclosure for the display.  All done and shared in TinkerCAD(.com).  The Arduino enclosure I'm considering (below) is borrowed from the MK II project shared here, but I want to ensure it will be moisture-resistant.


UPDATE: OK, a little more work, and a little more acceptable, but still far from "finished".  Gotta get more familiar with TinkerCAD.


Friday, December 27, 2013

I realized that the 0.1X Control Board, at 60 mm, is slightly wider than the prototype 4D display, which is *tiny*. The 4D Systems uOLED-128-G2's display area is only 27 mm square, and the whole display unit including screw mounting holes is only 45.56 mm wide. (Product info here).

I redesigned the control board to add some mounting holes, update the revision to 0.2x, and most importantly to be much more compact, especially in width, going down to exactly the width of the display unit (once the header tab is broken off the left side).

[Pictures removed, due to design being deprecated.]

Thursday, December 26, 2013

I took some time to add more documentation to the power supply circuit board, and a pre-drilled mounting hole in each corner.  I updated the version number of the power supply board to 0.2x, and then re-exported the project to OSHPark.com.

None of the wiring changed of course, and initial tests of the 0.1x board indicate success, e.g. when powered by a 12V battery, the circuit board puts out exactly 5V, and holds that 5V for several seconds after power is removed.  Under more of a load, that several seconds will probably be reduced to milliseconds, but that's all we need to power down the Arduino and display anyway.  My apologies for the "vertical video syndrome".

Wednesday, December 25, 2013

I had a bit of time to solder up the first power supply board this afternoon.  Everything fit well, except for the large screw terminal, the holes for which I had to bore out slightly.  I think it came out pretty well.


I don't want the smaller screw terminal to be top-entry (with the screws being hard to reach on the side), so I've updated the Mouser project to include a side-entry terminal (with the screws more accessible on the top).  All of the parts for the power supply components are available on Mouser, in a project saved here.

Monday, November 18, 2013

After only about a week, the boards were added to a "fab", printed and separated, and shipped.  Here they are, waiting for the components to be soldered on.


Monday, November 11, 2013

I'm leaning away from the "tachometer transplant" method based on interest in the project from others.  I'm currently considering strongly a custom-printed or -fabricated enclosure that mounts behind the steering wheel to the fixed portion of the steering column.

It should be easier to wire to, it would provide a housing for the four buttons I am planning for menu navigation, and it would not block anything except the "Unleaded Fuel Only" sticker, which for my car is slightly off-center which drives me nuts anyway.

For making the enclosures, I'm currently considering the gMax 3D printer - it's the only one large enough to print something bigger than cufflinks, so it would be useful to me post-project. Something like a 16x16x9 inch print area. My intention would be to figure out how to print A-pillar covers afterwards...


Currently working on proof-of-concept enclosures in TinkerCAD.

Monday, November 4, 2013

The components for the power supply are on order from Mouser, so it's time to send the printed circuit boards out for manufacture.

OSH Park will be handling this first batch.  I like their online configuration system and it takes the Gerber files out of Fritzing with apparently no problems.  It's also cheaper than Fritzing's built-in manufacturer, which I suspect is EUR-based as well (prices are in Euros).

And, they're an interesting color as well (purple).

[Pictures removed, due to design being deprecated.]

Monday, October 28, 2013

I've been reading up on power supplies for Arduinos installed in vehicles, and apparently cutting the power is bad in several ways.

So, I've borrowed the work of several others who were gracious enough to post their work online, and re-designed a printed circuit board that will provide enough power after the key is turned off to let the Arduino and 4D display power down gracefully.  The basic design I believe is from the "Practical Arduino" book, but "Sanja" was kind enough to make it available as a project and download for Fritzing here.  I did a lot of trace re-routing and fitting for my purposes, and version 0.1x is re-designed to my satisfaction in Fritzing and ready for manufacture.


Thursday, October 24, 2013

Just finished the code for setting the screen contrast, and am looking into an auto-dimmer function as well, which would probably be easier than tapping into the light dimmer because the brightness settings would be quite different. 

Wednesday, October 23, 2013

One more change, I decided to reconfigure the board to include headers to connect from inside to outside the eventual enclosure.  That way, it can be a "pop-off" design.


Tuesday, October 22, 2013

The button array, previously only in breadboard format, has been "virtualized" in Fritzing, and the printed circuit board (PCB) has been designed, both bare and "populated".  It's ready for manufacture.

NOTE: As there will undoubtedly be many revisions of circuit boards, the latest revision will always be linked to in the upper right of the blog.


Monday, October 21, 2013

Interface basic functions are complete. While the menu options themselves will change over time, the basic functions of scrolling the menu selector, performing the correct function when selected, and going "back" are implemented.


Sunday, October 20, 2013

The first version of the software is written, just enough to achieve a boot load on the 4D display (pass-through powered by the Arduino itself), to display the Splash, About and Main Menu screens.


Saturday, October 19, 2013

The button "array" is configured and wired up, and work continues on the menu system.


Tuesday, October 15, 2013

The project coding has been started and is now hosted by Atlassian's BitBucket.

Monday, October 14, 2013

The first draft of menus is done, and are designed for a planned 4-button interface with Up, Down, Back, Select being the primary ones.


Sunday, October 13, 2013

Here is a very crude mockup of what it would look like inside the gauge cluster.  This would only work for manual transmission vehicles, as that position in the lower half of the tachometer is taken up by the gear selector indicator (PRND321) with the Tiptronic (automatic) cars.


If it is not an option to mount the gauge within the instrument cluster, a small custom enclosure could be mounted on the fixed portion of the steering column which would place the screen right between the speedo/tach, and which would more easily facilitate multiple "buttons" to manage the interface. I think this would look a little more "tacked on", but it would make it much more accessible to people as not everyone wants to cut a hole in their tachometer.  Those things are $900+ to replace.

Saturday, October 12, 2013

Working with 4D's Workshop IDE, I've mocked up the beginnings of a Splash and About screens, primary menus (not shown), and the rudimentary beginnings of a Boost gauge. The font is as close as I could purchase to the existing gauges, being Eurostile Extended Black. For now, I call it "PDuino".


Friday, October 11, 2013

This blog will document my research into- and work toward- an electronic multi-function gauge for the Porsche 968, (and any other vehicle that is pre-OBD-II).  The interior of the 968 is particularly spartan in terms of room for adding things - witness the many failed attempts at the perfect cup holder. I'll add the components I am researching currently in this and subsequent posts.

I am currently leveraging the ideas of several people who kindly posted their ideas on the web, although they unfortunately did not post the real guts of their solutions. Credit where due to winmutt on superturbodiesel.com, and his thread.

After much research into Raspberry Pi, Netduino, Beaglebone and others (including a trip to NYC Maker Faire to see them all in action) I have decided my first foray will incorporate an Arduino microcontroller (Uno R3 specifically) to read the voltages from any sending units and to allow a platform for incorporating accelerometers, GPS sensors, wireless radios (Bluetooth, WiFi), USB and ethernet communications, and a wide variety of input devices (joysticks, keyboards, etc.)


Output will initially be driven to a 4D Systems 1.5" OLED capable of displaying text, graphics and video. I'm hopeful there is a place to mount this or a similar display unit flush behind the existing gauges (similar to in-dash displays in many modern cars), perhaps at the bottom of the tachometer. Being an OLED display, it requires no backlight and is extremely thin. I still need to do measurements and find out what kind of room is back there, and hopefully there aren't any warning lights embedded there either.